


Master Temporary Bridge Installation
Temporary bridges are engineered, deployable structures that restore access quickly while supporting construction, emergency response, or short-term traffic needs. This guide explains the temporary bridge installation process, covering phased workflows, launch methods, material choices, safety and regulatory considerations, resource mobilization, and common field challenges so teams can deploy modular bridges reliably. Readers will learn how to conduct a focused site assessment, choose appropriate foundations, assemble modular elements, execute launch sequences (cantilever, crane-assisted, lift-in, tail launch), and complete testing and handover with clear acceptance criteria. The article maps each phase to practical checklists, equipment tables, and decision matrices to help project managers, engineers, and contractors plan predictable timelines and reduce downtime. Throughout, the content uses terms like stress-laminated timber bridge, steel modular bridge, launch rollers, and load testing to integrate current technical practice and to target “temporary bridge installation process” and related keywords. Temporary bridges also serve diverse needs, from pedestrian crossings to heavy-duty logging bridges.
What Are the Essential Steps for Temporary Bridge Installation?
An effective temporary bridge installation follows a phased workflow: site assessment and planning, foundation preparation, modular assembly, launch/deployment, and final testing and handover. Each phase reduces risk through defined deliverables such as survey reports, bearing-capacity numbers, assembly checklists, and instrumented load tests that verify structural performance. Focusing on phased deliverables shortens decision cycles and improves safety because activities are sequenced with clear handoffs and quality checkpoints. The next subsections unpack each phase with actionable surveys, foundation options, assembly sequencing, launch-method selection, and final verification steps.
When planning installation, use a concise, numbered checklist that clarifies tasks and timelines for field crews and engineers.
- Conduct site survey and geotechnical investigation to establish constraints and bearing capacity.
- Finalize design and select bridge type and launch method based on span, access, and traffic needs.
- Prepare foundations and approaches to the specified bearing-capacity criteria.
- Assemble modular components in staged lifts and perform alignment and fastening checks.
- Execute launch procedure, complete load testing, and deliver as-built documentation.
This phased list helps teams align stakeholders and prepares the project for the next topic: conducting a comprehensive site assessment and planning.
How Do You Conduct a Comprehensive Site Assessment and Planning?

A comprehensive site assessment documents topography, access routes, traffic patterns, utilities, environmental constraints, and geotechnical parameters that directly dictate bridge type and foundation choices. Field surveys should include cross-sections, existing bank conditions, flood elevations, and preliminary bearing-capacity values so designers can map launch method feasibility and select appropriate abutment types. A structured survey report that includes a decision tree—matching span and soil class to recommended bridge systems—speeds approvals and prevents rework in the field. The next focus is translating those survey outcomes into foundation preparation strategies aligned with expected loads and site conditions.
What Are the Key Considerations for Foundation Preparation?
Foundation preparation begins with matching soil bearing capacity to foundation type—spread footings and precast blocks work where bearing capacity is adequate, while driven piles or ground improvement are required for weak soils or high scour risk. Geotechnical metrics such as allowable bearing pressure and estimated scour depth guide choices; for example, soils below roughly 50 kPa may trigger piling or engineered mattress solutions. Site prep includes clearing, compacting approach pads, installing erosion control, and placing level-bearing surfaces for modular abutments or precast blocks. Preparing foundations correctly reduces settlement risk and ensures the bridge interfaces cleanly with launch and decking operations.
How Is Modular Bridge Assembly Performed Step-by-Step?
Modular assembly proceeds through controlled unloading, staging, alignment, mating of truss or panel sections, bolting/pinning, and decking installation with progressive quality checks for torque and alignment. Crews should follow a documented assembly sequence and use calibrated torque tools for structural fasteners while performing alignment checks with stringlines and level instruments. Key roles include the project manager, riggers, bolting crew, welder (if required), and QA inspector; each role has defined acceptance checks at completion of mating and deck installation. Proper staging and pre-assembly accelerate the launch phase and reduce time under crane lifts or traffic interruptions. For advanced solutions, consider modular temporary bridge systems that offer versatile deployment with patented shear-key technology.
Which Launch Methods Are Used for Temporary Bridge Deployment?
Selecting a launch method depends on site access, span, available equipment, and environmental constraints; common options include cantilever launch, crane-assisted lifts, lift-in of prefabricated modules, and tail launch techniques. Each method balances speed and equipment needs—cantilever launch minimizes crane work but requires launching noses and temporary supports, while crane-assisted lifts reduce sequential pushing operations but demand crane access and lift plans. Matching launch method to constraints reduces risk and supports efficient schedule recovery when delays occur. With that context, the next section describes final testing and handover procedures that confirm the structure meets load and safety criteria.
How Do You Finalize Installation with Testing and Handover?
Finalization includes decking, parapets, handrails, safety barriers, instrumented proof load testing, and delivery of as-built documentation with maintenance and inspection schedules to the client. Load-testing protocols should combine a proof-load event with targeted instrumented tests—deflection monitoring and strain gauges—to validate design-rated performance under traffic loads. Handover deliverables include inspection reports, test results, as-built drawings, and a short client training session for routine inspections and temporary maintenance. Completing these steps ensures operability and creates a clear acceptance record that transitions responsibility to the owner or operations team.
For turnkey projects requiring integrated design, manufacturing, and installation, some providers offer end-to-end delivery as an example of how phased installation workflows translate to single-source accountability.
E&H Manufacturing, Inc. provides design, manufacturing, and installation services for temporary bridge systems, including stress-laminated timber solutions that enable rapid, turnkey deployment; teams often choose single-source delivery to accelerate schedule and reduce coordination risk. If you are evaluating turnkey options, consider providers that combine rapid deployment capabilities with modular fabrication for predictable timelines and simplified handover.
This business-focused note connects the phased workflow to procurement choices and leads naturally into comparing construction methods.
What Are the Most Effective Temporary Bridge Construction Methods?
Temporary bridge construction methods vary by equipment intensity, site footprint, and speed of deployment; selecting the right method hinges on span, access, available cranes, and traffic interruption tolerances. Comparing methods with clear advantages and limitations helps project teams choose a method that balances schedule and risk. The table below maps common launch methods to typical use cases, advantages, limitations, and estimated timeframes so decision-makers can align method to site constraints before mobilizing equipment.
This comparison clarifies which method best fits constraints and leads into deeper explanations of each method’s mechanics and on-site considerations.
How Does Cantilever Launch Work for Temporary Bridges?
Cantilever launching extends the bridge progressively from one bank using a launching nose that reduces cantilever moment until the far abutment is engaged; temporary supports and counterweights help manage stresses during incremental pushes. The method is effective where cranes cannot operate over the span and where continuous launching reduces setup time, but it requires careful control of bending moments and launch geometry. A thorough launch plan includes monitoring for deflection, temporary bracing schedules, and checks on the launching nose connection integrity. Understanding these mechanics informs when to choose cantilever launch over crane-assisted or lift-in approaches.
What Are the Advantages of Crane-Assisted Bridge Installation?
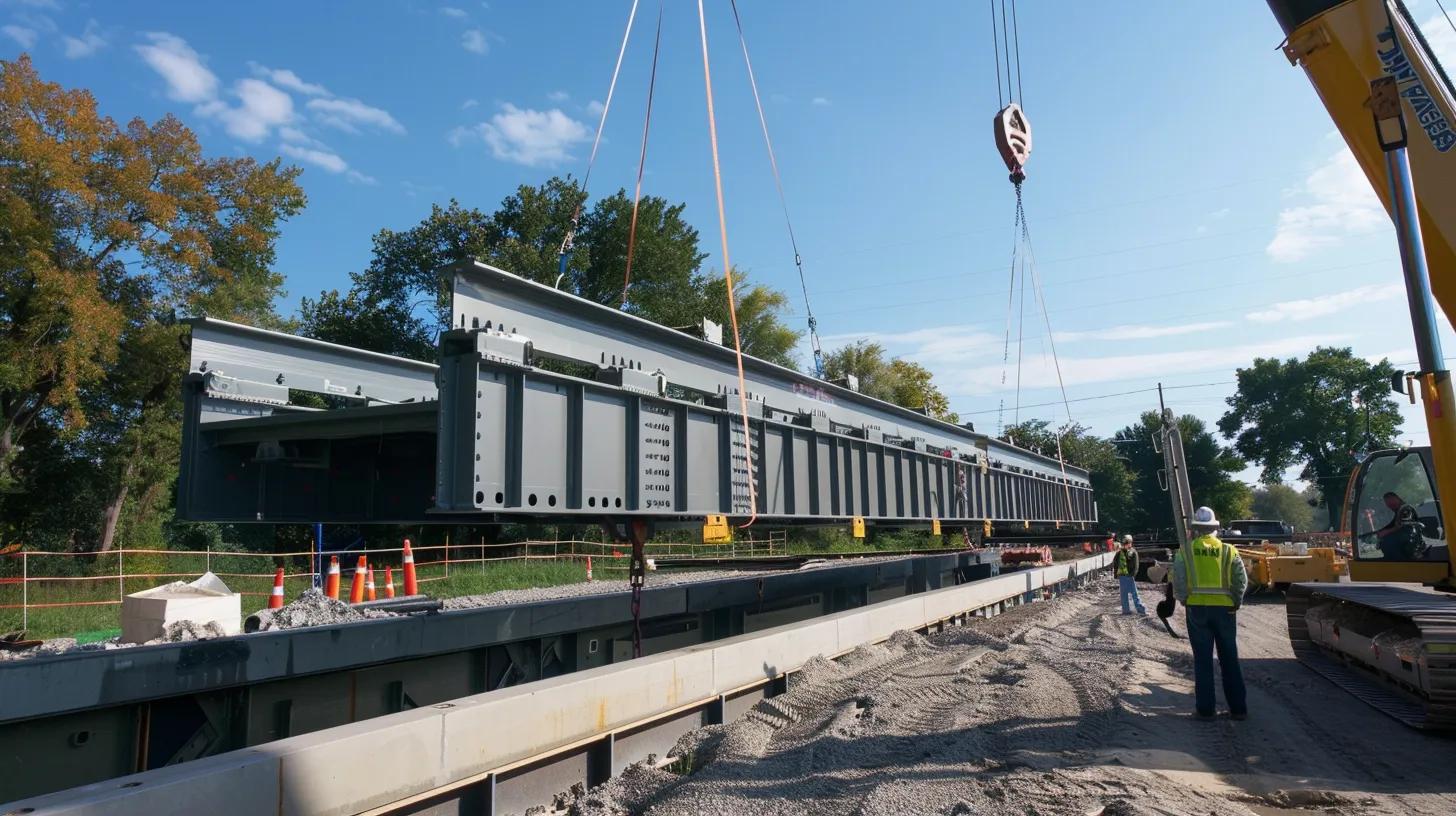
Crane-assisted installation places prefabricated bridge modules directly onto prepared abutments or supports, offering speed and precision that reduce lane closure durations and on-site sequencing complexity. Key planning items include selecting a crane with adequate lift capacity and reach, designing rigging plans, and sequencing lifts to avoid simultaneous critical lifts that create worker conflicts. Crane-assisted methods are especially advantageous for long-span modules where rapid placement offsets crane mobilization time and cost. The next section discusses lift-in methods, which share some benefits but differ in coordination with hoisting crews.
When Is the Lift-In Method Preferred for Portable Bridge Setup?
Lift-in installs use prefabricated modules hoisted into position, ideal for urban or constrained sites where assembling at grade is impractical and short, planned closures are acceptable. Coordination for lift-in involves synchronized rigging crews, traffic management for brief closures, and often requires temporary bearing plates or small adjustments for fit-up. Lift-in reduces time under active traffic and simplifies QA by limiting on-site assembly to connection verification rather than full fabrication. This understanding points directly to tail launch, a contrasting rapid-deployment technique useful for certain site geometries.
How Does Tail Launch Facilitate Rapid Bridge Deployment?
Tail launch pushes the bridge from the rear onto prepared approaches, offering rapid deployment for short spans where approaches are flat and unobstructed, and where minimal temporary works are required. Tail launch is fast because modular units are moved in a single sequence without complex launching noses, but it is constrained by approach geometry and typically limited to lighter modules or shorter spans. Planning includes ensuring approach stability, selecting low-friction rollers or sliding systems, and preparing stopping and locking systems to secure the structure after launch. With launch methods clarified, material selection becomes the next critical determinant of performance and logistics.
Which Materials Are Best for Temporary Bridge Installation?
Material selection depends on load requirements, expected duration, environment, transportability, and budget; top materials include stress-laminated timber, steel modular systems, composite decks, and aluminum where weight is critical. Each material offers unique trade-offs in strength, weight, durability, span capability, and cost that should map to project requirements via an EAV comparison. Below is a comparison table to help spec selection based on common attributes and project priorities.
This table highlights that selection must balance structural needs, transport logistics, and lifecycle considerations; the following subsections explore each material’s traits and use cases.
What Are the Benefits of Stress-Laminated Timber Bridges?
Stress-laminated timber bridges consist of multiple hardwood or engineered timber planks compressed together to form a continuous deck that performs similarly to a solid slab, offering high stiffness-to-weight ratios and rapid on-site installation. They are sustainable, reusable, and well-suited for emergency access and short-to-moderate spans where rapid deck placement and low equipment needs matter. Stress-laminated decks can be pre-manufactured to modular dimensions and installed quickly with modest lifting equipment, reducing mobilization time and environmental footprint. Understanding timber benefits helps teams weigh sustainability and deployment speed against heavier steel options.
When considering timber for temporary applications, note that protective treatments and drainage detailing extend service life and reduce maintenance during deployment.
E&H Manufacturing, Inc. fabricates and installs stress-laminated timber bridge systems as part of its temporary bridge offerings, emphasizing rapid deployment, adaptability, and cost-effectiveness for emergency access and construction support.
How Do Steel Modular Bridges Enhance Strength and Versatility?
Steel modular bridges deliver high load capacity and precise prefabrication, allowing longer spans and heavier loads than most timber solutions while enabling fast bolted assembly on-site. Steel modules are advantageous for heavy haul routes or longer spans, and protective coatings or galvanization extend service life in corrosive environments. Logistics for steel include higher transportation weight and potential crane requirements, but the modular precision reduces field fit-up time and supports repeatable installations. Understanding these trade-offs enables teams to match steel solutions to projects that demand high capacity and extended temporary service.
What Are the Features of Composite Temporary Bridges?
Composite or FRP systems are lightweight, corrosion-resistant, and offer low maintenance during deployment, making them attractive for marine, coastal, or chemically aggressive environments where corrosion undermines steel. Composites reduce transport and lifting requirements due to low weight but have cost and stiffness trade-offs that may limit use for heavy vehicle traffic. Their long lifecycle under corrosive conditions and rapid installation make composites appropriate for environments where lifetime maintenance is prohibitive. Evaluating composites against load demands helps identify when the weight savings offset higher material costs.
How to Compare Temporary Bridge Materials for Your Project?
Use a decision matrix that maps project criteria—load, span, duration, environment, access, and budget—to material characteristics to select the optimal system for a specific site. Key decision rules include prioritizing steel for high loads and long spans, timber for rapid, low-equipment deployments, and composites where corrosion resistance and weight reduction are primary concerns. The matrix approach clarifies procurement priorities, reduces specification ambiguity, and accelerates vendor comparisons. With materials selected, safety protocols and compliance considerations must be integrated before mobilization.
What Safety Protocols and Regulatory Requirements Must Be Followed During Installation?
Safety protocols combine worker protection, traffic management, rigging standards, and adherence to applicable guidelines such as AASHTO and FHWA guidance to ensure temporary structures meet design load ratings and public safety expectations. A project-specific site safety plan should set exclusion zones, PPE requirements, lift plans, and inspection intervals to keep personnel and users safe during assembly and launch operations. Regulatory considerations include load-rating documentation, engineering sign-off for major installations, and coordination with permitting authorities for environmental and traffic impacts. The next paragraphs outline on-site safety controls, standards application, and permitting steps.
Start with a prioritized safety checklist that informs the daily work plan and integrates regulatory checkpoints.
- Ensure exclusion zones and traffic controls are established and documented before onsite lifts.
- Verify all rigging and lift plans are stamped or reviewed by a qualified lift planner or engineer.
- Require calibrated torque tools, inspection of lifting slings, and pre-shift equipment checks.
- Maintain daily inspection logs and immediate remediation of identified hazards.
This checklist supports consistent compliance and leads into how standards like AASHTO and FHWA apply to temporary bridges.
What Are the Key Safety Precautions for Temporary Bridge Installation?
Key precautions include establishing exclusion zones, rigorous lift planning, enforcing PPE for all crew, performing daily equipment inspections, and implementing traffic control plans for site access and live-road operations. Riggers and crane operators should be certified, and lifting gear must have traceable inspection records; pre-lift briefs help clarify roles and emergency stop protocols. Inspection intervals should include pre-mobilization, daily visual checks, and instrumented monitoring during critical operations like launches. These controls cascade into the need to align designs with recognized standards to ensure load-rating and acceptance criteria are defensible.
How Do AASHTO and FHWA Standards Apply to Temporary Bridges?
AASHTO and FHWA guidance provide frameworks for load ratings, design verification, and acceptance testing that are often adopted as benchmarks for temporary bridge installations to ensure public safety and insurer acceptance. Temporary bridges are typically assessed against AASHTO load models and local jurisdictional requirements, and formal engineering sign-off is required when installations carry live traffic or heavy loads. Practical implications include preparing load-rating calculations, specifying inspection intervals, and documenting instrumented test results for acceptance. Translating these standards into field protocols reduces ambiguity during inspections and handover.
What Environmental and Permitting Considerations Are Required?
Environmental and permitting steps commonly include erosion and sediment controls, wetland and stream impact evaluations, temporary cofferdam or staging permits, and stakeholder notifications to local authorities and landowners. Early engagement with permitting agencies prevents schedule slippage, and mitigation measures—riprap, silt fencing, or turbidity curtains—should be specified in construction documents for in-stream work. Permitting timelines can influence method selection and mobilization windows, so integrating regulatory tasks into the project schedule is essential. For projects involving waterways, consider environmentally responsible stream crossing solutions. With permitting addressed, resource planning becomes the immediate next task.
How Can You Plan and Mobilize Resources for Efficient Temporary Bridge Installation?
Efficient mobilization requires matching equipment and crew composition to chosen launch method and material type, preparing access roads and staging areas, and sequencing critical-path tasks to minimize idle time. Early resource planning includes defining required cranes, rollers, transport trailers, bolting crews, riggers, and QA inspectors and scheduling their arrival to align with foundation readiness. The table below provides a quick mobilization EAV that planners can use to estimate counts and specs when preparing quotes or procurement lists.
This mobilization matrix supports efficient procurement and informs the following equipment and personnel checklist.
What Equipment and Personnel Are Needed for Installation?
Essential equipment includes cranes sized to module weights, launch rollers or sliding systems for cantilever or tail launches, transport trailers, bolting and torque tools, and instrumentation for load testing; personnel roles include project manager, lead engineer, certified crane operator, riggers, bolting crew, and QA inspector. Crew composition should reflect the assembly rate—for example, larger modules require more riggers and a dedicated QA inspector during bolting operations to maintain acceptance rates. Pre-mobilization checklists should confirm certifications, equipment inspections, and spare critical fastener inventories to avoid delays. Properly matching crew to equipment shortens field hours and improves safety, which leads to the next focus on preparing the site and access roads.
- Prepare access roads and unloading areas with compaction and stabilization to support heavy transports.
- Establish staging zones sized for module storage and assembly with clear traffic lanes.
- Pre-position erosion control and approach fill materials to accelerate foundation handovers.
- Schedule police or flagging resources for traffic management during critical lifts.
This list clarifies site-prep priorities and transitions to coordination of timelines and deployment phases.
How Do You Prepare the Site and Access Roads for Bridge Setup?
Site preparation includes clearing, grading, constructing temporary ramps or approach fills, and stabilizing access routes to support heavy transport and crane pads without rutting or settlement. Best practices include using geotextile underlayment on approach fills, specifying compaction criteria for crane pads, and staging material deliveries to avoid blocking work zones. Temporary traffic management plans should be rehearsed with crews to minimize lane closure durations and ensure worker safety. These site-prep measures enable timely assembly and proceed naturally into project timeline coordination and contingency planning.
How to Coordinate Project Timelines and Deployment Phases?
Coordinate timelines by identifying critical-path tasks—geotechnical report delivery, foundation completion, crane mobilization, and final load testing—and gating phases so that delays in one area do not cascade into others. Create short, milestone-driven phasing with clear acceptance criteria for each handoff and include contingency buffers for weather, permitting, or supply disruptions. Fast-track strategies include pre-manufactured modular kits, night or staged closures to reduce downtime, and parallel work streams where safety allows. Effective timeline coordination ensures the project meets operational restoration goals, which brings us to common challenges and mitigations often seen in the field.
What Are Common Challenges and Solutions in Temporary Bridge Installation?
Common challenges include limited site access, poor soil conditions, high water flow, utility conflicts, and compressed schedules; mitigation strategies combine alternative foundation choices, modular selection, pre-positioned kits, and contingency mobilization plans. Anticipating these constraints reduces reactive decision-making and enables teams to switch to alternate launch methods or materials quickly. The following list presents typical challenges and practical solutions that preserve schedule and safety.
- Limited access: use lighter modular components, lift-in methods, or staged deliveries to reduce on-site footprint.
- Poor soils: select piled foundations, precast blocks with soil improvement, or geotextile-reinforced approach pads.
- High water flow: schedule low-flow windows and use temporary cofferdams and erosion control measures.
- Utility conflicts: perform early utility locates and coordinate relocations before mobilization.
Implementing these mitigations decreases surprises and leads into load assurance and structural integrity practices.
How to Overcome Site-Specific Obstacles During Installation?
To overcome obstacles like restricted access or congested sites, consider modular sizes that fit local lift constraints, use lighter composite panels where transport limits exist, or employ lift-in strategies that shorten on-site assembly. For poor soils, integrate ground improvement or pile foundations into the schedule and prepare temporary approach ramps to ensure safe transport. Coordination with utility owners and environmental agencies early reduces late-stage redesigns. These solutions connect directly to best practices for ensuring load capacity and structural integrity during acceptance testing.
What Are Best Practices for Ensuring Load Capacity and Structural Integrity?
Best practices include instrumented load testing with deflection and strain monitoring, temporary bracing during launch, calibrated torque verification for all bolted connections, and documented inspection regimes including pre- and post-launch checks. Use structural instrumentation to capture performance during proof-loads and create traceable records for client acceptance. Regular inspection intervals after initial placement detect settlement or connection loosening early and protect against unplanned closures. These verification steps support rapid-response performance and prepare teams for emergency deployment scenarios.
How to Manage Emergency Bridge Deployment Under Time Constraints?
Emergency deployment emphasizes rapid assessment, preconfigured modular kits, and prioritizing critical-path actions: immediate survey, rapid foundation stabilization, and quick mobilization of modular components with staged crane or roller resources. Pre-positioned kits and practiced crews shorten mobilization to hours rather than days, and a pre-approved method and permitting template speeds regulatory notifications. Rapid-deployment checklists should prioritize safety, traffic restoration, and temporary protective measures while permanent solutions are planned. For more details on rapid response, explore emergency temporary bridges. These practices set the stage for reviewing real-world execution examples and lessons learned.
How Have Successful Temporary Bridge Installations Been Executed?
Successful installations share common factors: rapid, focused assessment, use of modular systems that match site constraints, strong coordination between design and field teams, and documented testing that verifies load performance before opening to traffic. Case-study summaries illustrate measurable outcomes—time-to-restore access, achieved load ratings, and lessons learned about method selection and logistics. The following subsections distill lessons from emergency access deployments, construction-site uses, and summarized case teasers from a manufacturer experienced in stress-laminated and modular systems.
What Lessons Can Be Learned from Emergency Access Bridge Deployments?
Emergency deployments highlight the importance of preplanning, modular kit availability, and single-source accountability to reduce coordination friction; projects that pre-validated method and material combos consistently restore access faster. Key lessons include prioritizing minimal foundation works where possible, staging materials upstream of the site, and using instrumented proof-load tests to build stakeholder confidence quickly. Post-deployment follow-up ensures that temporary structures are monitored and transitioned properly when permanent repairs proceed. For more insights, refer to resources on emergency temporary bridges for disaster recovery. These lessons inform how temporary bridges serve as effective interim infrastructure during crisis response.
How Are Temporary Bridges Used in Construction Site Management?
Construction sites utilize temporary bridges for material haul routes, worker access, and staged traffic rerouting to keep workflows continuous while permanent structures are built or repaired. Integrating temporary bridges into construction logistics reduces haul distances, concentrates traffic on engineered routes, and protects sensitive staging areas from heavy-use damage. Sequencing temporary bridge use with construction phasing—installing early for material delivery and removing when permanent routes are set—optimizes both cost and schedule. Learn more about construction site temporary bridges. These operational uses demonstrate the value of pre-planned temporary infrastructure in complex projects.
What Are Notable E&H Manufacturing Case Studies Demonstrating Expertise?
E&H Manufacturing, Inc. has delivered temporary bridge solutions combining stress-laminated timber fabrication and modular installation that restored access rapidly and cost-effectively for construction and emergency applications; summarized outcomes include restored access within compressed timeframes and durable load-rated decks suitable for repeated use. Case teasers show measurable results such as rapid deployment timelines and adaptable configurations that met site-specific constraints while minimizing environmental impact. For organizations seeking custom temporary bridge solutions, E&H Manufacturing offers design-manufacture-install workflows that simplify execution and accelerate recovery.
If you want detailed case-study documentation or a quote for a custom temporary bridge solution, contact a provider that offers turnkey design and installation options to discuss site specifics and deployment timelines.
Frequently Asked Questions
What are the typical costs associated with temporary bridge installation?
The costs of temporary bridge installation can vary significantly based on factors such as the type of bridge, materials used, site conditions, and duration of use. Generally, costs include materials, labor, equipment rental, and any necessary permits. For instance, stress-laminated timber bridges may be more cost-effective for short-term needs, while steel modular bridges, though more expensive, offer higher load capacities. It’s essential to conduct a detailed cost analysis during the planning phase to ensure budget alignment and avoid unexpected expenses.
How long does it typically take to install a temporary bridge?
The installation time for a temporary bridge can range from a few hours to several days, depending on the chosen launch method, site conditions, and complexity of the design. For example, lift-in methods can be completed in a matter of hours, while cantilever launches may take several days due to the incremental nature of the process. Effective project management and pre-planning can significantly reduce installation time, ensuring that access is restored as quickly as possible.
What maintenance is required for temporary bridges during their use?
Maintenance for temporary bridges typically involves regular inspections to ensure structural integrity and safety. This includes checking for signs of wear, loose connections, and any environmental impacts such as erosion or flooding. Depending on the materials used, additional maintenance may involve cleaning, applying protective coatings, or making minor repairs. Establishing a maintenance schedule and documenting inspections can help prolong the bridge’s lifespan and ensure compliance with safety regulations.
Can temporary bridges be used in environmentally sensitive areas?
Yes, temporary bridges can be designed and installed in environmentally sensitive areas, but careful planning and adherence to regulations are crucial. This may involve using materials that minimize ecological impact, implementing erosion control measures, and obtaining necessary permits. Additionally, employing methods like lift-in or cantilever launch can reduce the footprint and disturbance to the surrounding environment. Engaging with environmental agencies early in the planning process can help mitigate potential issues and ensure compliance with local regulations.
What are the safety measures during the installation of temporary bridges?
Safety measures during temporary bridge installation include establishing exclusion zones, using personal protective equipment (PPE), and conducting thorough pre-lift briefings. Rigging and lift plans must be reviewed by qualified personnel, and daily inspections of equipment are essential. Additionally, implementing traffic management plans and ensuring that all crew members are trained in emergency protocols can significantly enhance safety during the installation process. Regular safety audits and adherence to standards like AASHTO and FHWA further ensure compliance and worker safety.
How do you determine the appropriate type of temporary bridge for a project?
Choosing the right type of temporary bridge involves assessing several factors, including load requirements, span length, site conditions, and duration of use. Conducting a thorough site assessment and geotechnical investigation helps identify the best foundation options and bridge types. Additionally, considering the available equipment and access constraints will influence the decision. Engaging with experienced engineers or bridge manufacturers can provide valuable insights and recommendations tailored to specific project needs.
What are the environmental impacts of temporary bridge installations?
Temporary bridge installations can have various environmental impacts, including soil disturbance, waterway obstruction, and potential harm to local wildlife. To mitigate these effects, it is essential to implement erosion control measures, conduct environmental assessments, and follow best practices for site management. Using modular designs that minimize the footprint and employing temporary cofferdams can help protect sensitive areas. Engaging with environmental stakeholders and adhering to regulations ensures that installations are conducted responsibly and sustainably.